Interested in learning how to play classical guitar? This page will guide you through the fundamentals of classical guitar and provide a number of beginner classical guitar lessons.
Classical Guitar Positions
Underpinning all of the playing you will do on your musical journey are three important elements: the sitting position, the left-hand position, and the right-hand position. Be sure to get these three fundamentals set up correctly before you proceed to anything else.
The Sitting Position
Before you can do anything on the classical guitar you will need to find a comfortable sitting position that will serve your practice for many years to come.
The Left-hand position
In beginner lessons for the classical guitar you will find single notes, perhaps some chords, but nothing too demanding at the outset. As you progress towards intermediate and advanced territory, however, your left-hand movement will become increasingly complex. Because of this, you need to establish a left-hand position that can deal with this complexity even though it may not be present right now. So, even if some alignment concepts don’t seem useful right now, know that you are laying good foundations for the future.
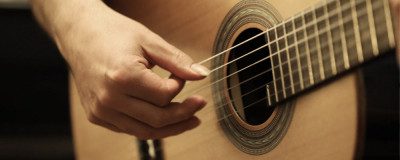
The Right-hand position
The right hand using PIMA and is often thought of as the “paint brush”. We create tone colors, pluck rhythms, play chords, and alternate between fingers. With all of this complex movement, you will need to establish a comfortable and effective right-hand position.
Basic Techniques for the Beginner Classical Guitarist
Free stroke (tirando)
 The free stroke is by far the most common type of finger movement the right hand makes. It involves the finger moving through the string, clearing the adjacent string and back towards the palm.
Because it is such an integral part of classical technique, it will require some dedicated work to master. Even more important is to start out with the correct movement so as not to develop bad habits.
Rest stroke (apoyando)
The rest stroke is the counterpart to the free stroke, although we use it far less. The movement has the finger move through the string and literally rest on the adjacent string. This movement is strong and will create a powerful sound on the guitar.
Players often take advantage of the rest stroke’s strong quality by using it to bring out melodies or important musical lines.
Right-hand alternation
When we play with our right hand we will either play the string with one digit, with multiple digits together (to play a chord), or play multiple strings by strumming across the strings. If we were to use only one finger all the time to play single notes, our hand would get tired and we couldn’t play the notes very fast at all. Because of this, classical guitar technique uses alternation in the right hand. The most common alternation is between i and m, but you can have all sorts of alternations. Other possible combinations are: im, mi, ia, ai, ma, am, pi, pm, ami, pima, etc.
One very important aspect of alternation to focus on in the beginning is to keep it consistent. It is very easy to start repeating fingers. So record your self or get your teacher to check that you are alternating every single note.
Read the lesson on alternation here.
Scale Practice
Scales are an essential tool for the beginner classical guitarist to improve both right and left-hand technique. Scales incorporate alternation, fingerboard knowledge, left-hand positioning, shifting, and synchronization between both hands. As a beginner you will want to start with one of the most fundamental scales: the C Major Scale. This scale will help you learn the notes in first position and develop your overall technique in the process.
How to Practice Classical Guitar as a Beginner
Learning how to practice effectively as a beginner guitarist will help you improve quickly. Establishing good practice habits early in your journey will lay the foundations for improvement over the long term.
How Much Should I Practice?
In the beginner stages you should prioritize quality over quantity when in comes to practice sessions. Fifteen- to thirty-minute sessions each day will improve your playing faster than a long two-hour sessions once or twice a week. In an ideal world, I would recommend an hour a day in the beginner stages.
What should I Practice?
As a beginner the most important thing to focus on is establishing a solid technique. While it is tempting to dive straight into repertoire, if you have the patience and diligence to focus primarily on technique you will be better off in the long run. Fundamental techniques such as free stroke, alternation, sitting position, and hand positions will pave the way to your first repertoire.
If you forego this step and dive into repertoire without a solid technique then you risk developing a poor playing style that will be hard to change. Inside the CGC Academy you will find a series of lessons in the Fundamentals and Grade 1 that prepare you in a progressive way before you encounter your first simple piece of repertoire.
How do I Establish a good Technique?
Slow and mindful repetition of basic movements combined with regular feedback on your playing will allow you to create a good technique. Simple movements such as open-string free strokes, beginner scales, basic arpeggios, and left-hand walking will help you in the beginner stages. It is important to keep the exercises simple because there are so many things to monitor. Sitting position, right and left-hand positions, alternation, finger placement on the fingerboard, these are all fundamentals that need close attention. Once again, resist the temptation to play faster or more complex material until you have mastered the fundamentals.
Playing not Practicing
Even if you are putting a lot of time into your guitar playing it doesn’t guarantee that you will improve. An easy trap to fall into is that of playing rather than practicing. Practice should be focused, organized, and intentional whereas playing might resemble “tinkering” or “noodling” aimlessly.
How to Read Sheet Music on the Classical Guitar
The classical guitar repertoire is predominantly written in standard notation. While reading TAB will work with basic repertoire, it will be necessary at some point to learn how to read music. So I recommend starting with notation as soon as you can.
Reading music for the classical guitar can be a challenging process but when done in an incremental fashion it is very much achievable. The method book that does this very well is The Cornerstone Method for Classical Guitar Grade 1. This method takes you through notation in a step-by-step fashion and provides music to play as you learn new rhythms and notes.
This lesson on how to read sheet music on the guitar offers a good starting point for you to learn music notation.
Common Mistakes by Beginner Classical Guitarists
After working with thousands of guitarists at CGC Academy I have been able to identify common mistakes beginners make in the early stages of learning.
- Not alternating fingers
- Poor hand positions
- Working on repertoire that is too difficult
- Playing, not practicing
- Poor finger placement and lifting fingers
The Best Way to Learn Classical Guitar

Without question, the best way to learn classical guitar is to work with an experienced teacher who has a structured approach to learning and a proven record with both education and performance. If you are lucky enough to have a world-class teacher close to home then don’t hesitate to reach out and ask for guidance. If you have found that you like my teaching style as presented in this beginner classical guitar guide then I encourage you to learn more about my online curriculum at Classical Guitar Corner Academy.