How to change strings on classical guitar
Changing strings on a classical guitar is actually an easy process. While it can seem daunting at first, there’s no need to worry. We’ll show you clearly the steps to make it work for you so you can get a fresh set of strings on your guitar in no time!
(Please note these tips are for changing strings with a 6-hole tieblock. If you have a 12-hole tieblock you’ll need to take a couple of extra precautions in tying the strings at the bridge.)
What You Need
To start out, after you’ve picked up a new pack of strings (more below with our recommendations for brand of strings) you’ll want to have a good place to work with and a few tools. Working from a table or desk is best so that you can lay the guitar down flat and not worry about maneuvering the instrument in your lap. A couple of tools that can be helpful are:
- A neck-up tool, which supports the underside of the neck of the guitar so you can freely turn the tuning pegs with the guitar laying flat on the surface of your table or desk.
- And, secondly, a string winder is useful, which allows you to turn the tuning pegs quickly (especially helpful for removing old strings).
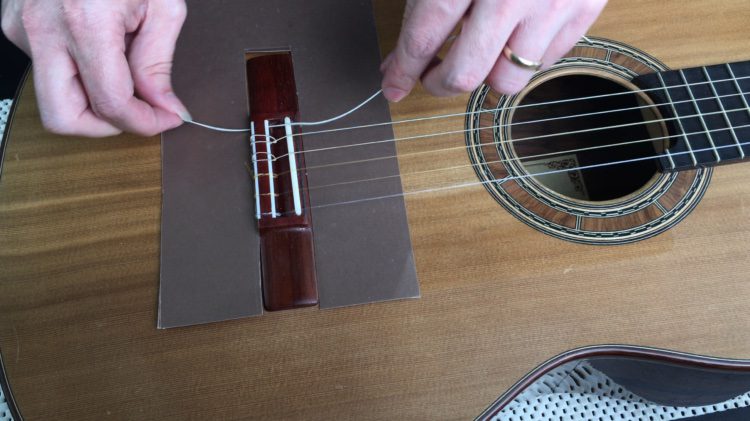
- There are also various protective materials you can purchase to place around or behind the bridge so that if an accident happens and a string comes undone you won’t ding the top of your guitar — here’s one you might check out. But a piece of thick card stock cut to fit around your bridge should do just fine as well.
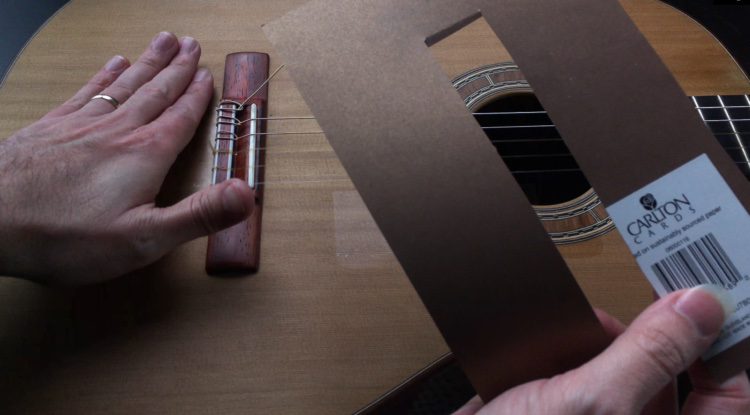
You may also want something like shelf liner under the body of the guitar to keep it from shifting around on the table or desk as you work.
Step 1: Remove Old Treble Strings
First, you need to remove your old strings. There are various ways to do this and some luthiers will tell you only to remove and change one string at a time so that you are leaving tension on the neck. The idea here is that removing all of the strings and thus all of the tension at once can put stress on the neck of the instrument. Others will tell you, however, that it isn’t an undue amount of stress and that it will be fine to remove all of the strings at once. Check with your luthier to see what she or he recommends. But here’s my method: remove all of the treble strings first and change those before moving on to the basses.
- First, hand-tune the 1st E string to make sure you are lowering the pitch.
- Then use your string winder to continue winding in that same direction to remove all tension from the string until the string is completely slack.
- Next, remove the string from both the headstock slot and from the bridge. If you do not have a bib or some other protective material at the bridge, be careful not to scratch the top as you remove the string there.
- Continue unwinding the 2nd B and 3rd G strings in the same direction as the 1st E until all trebles are removed.
Step 2: Put on New Treble Strings
At the bridge
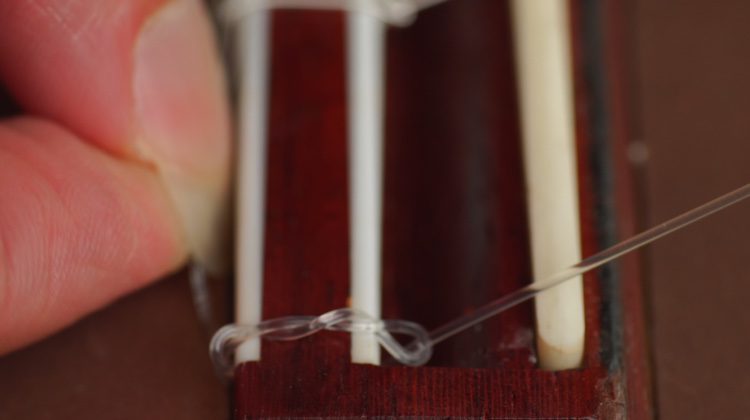
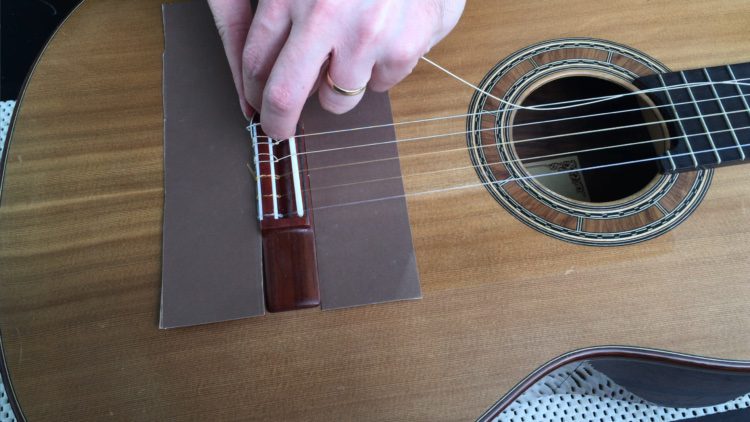
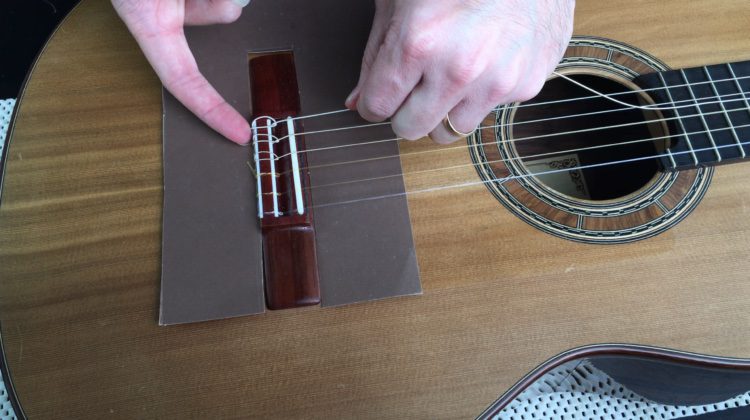
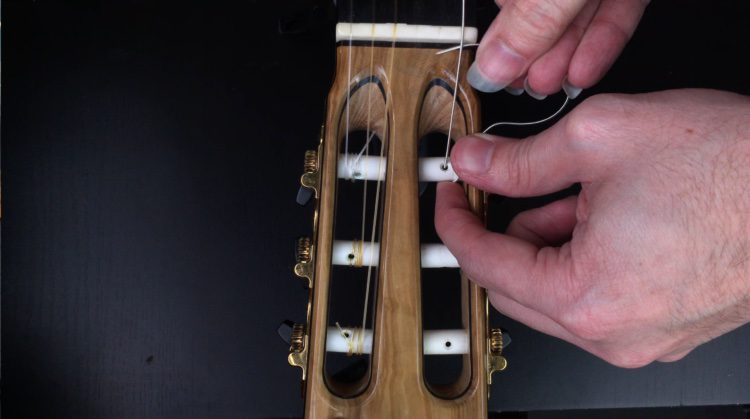
- Now take your new 1st E string and insert one end of the string into the first-string hole in the bridge. Leave enough extra string through the hole that you can wrap around the string about 2-3 times.
- Next, wrap the tail end of the string back around itself 2-3 times in a figure-8 pattern so that the wraps lay flat on the top of the bridge and the tail of the string is tucked comfortably on the back side of the bridge. You want to be very careful that the tail of the string is not sitting on the top or the back corner of the bridge, but is tied on the flat, back side of the bridge. Place a finger on top of the wraps of the string on the bridge and with the other hand pull the rest of the string taut so the wraps are nice and tight.
At the headstock
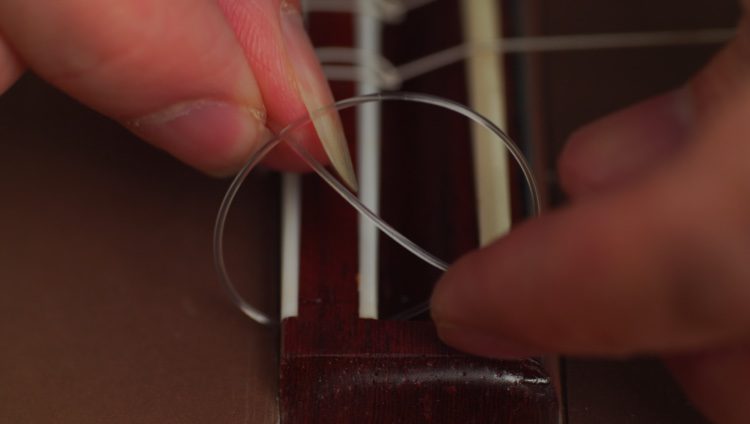
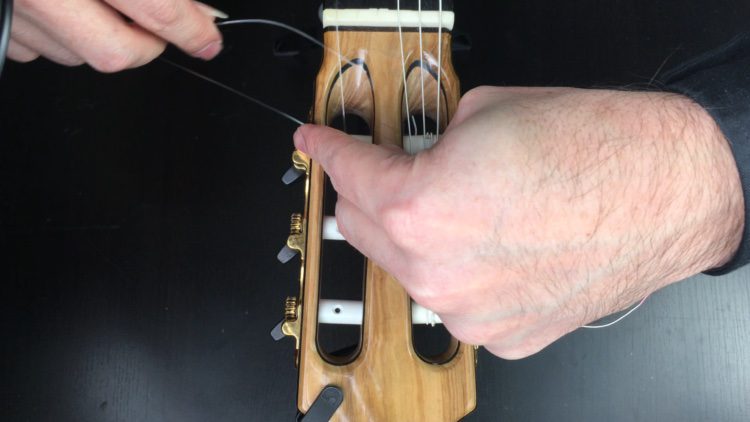
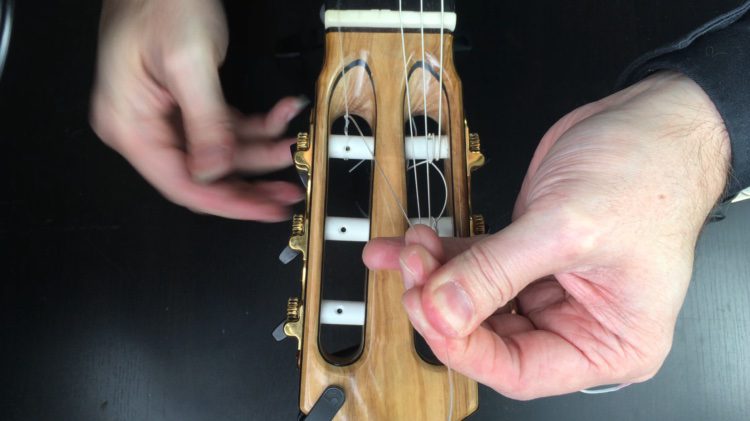
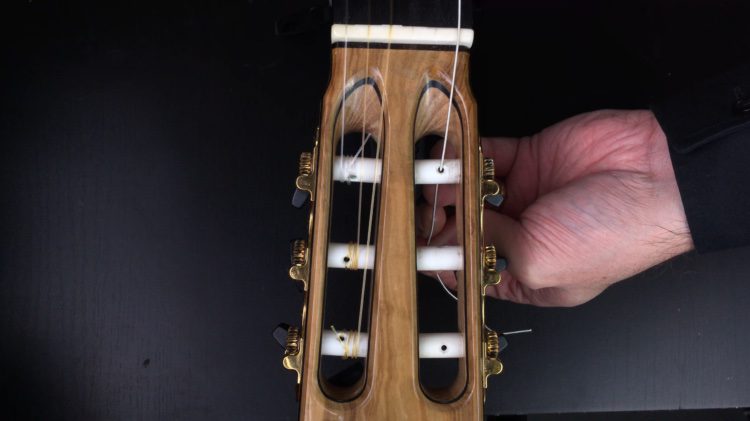
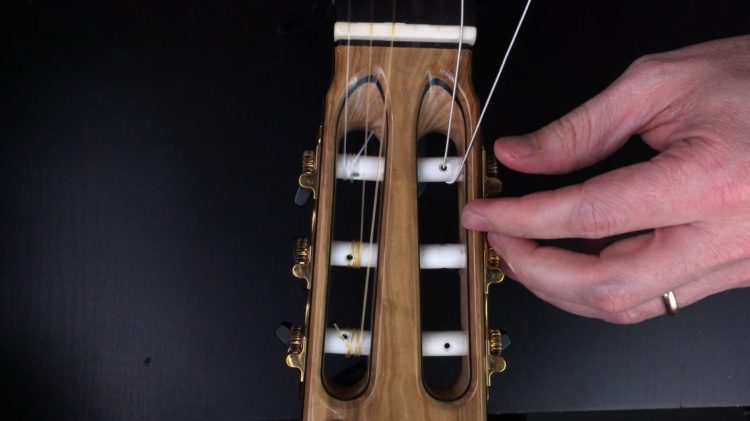
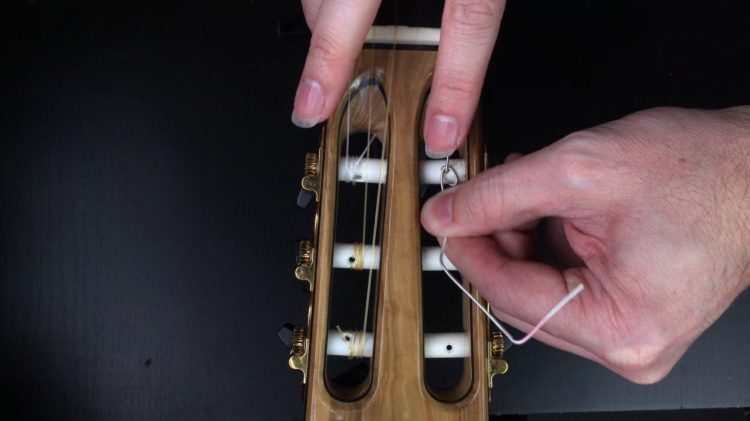
- Insert the other end of the same string into the hole of the headstock slot for the first string and pull until the string is taught. Just remove the slack, you don’t have to tug hard. Pull the string around the barrel back toward the rest of the string.

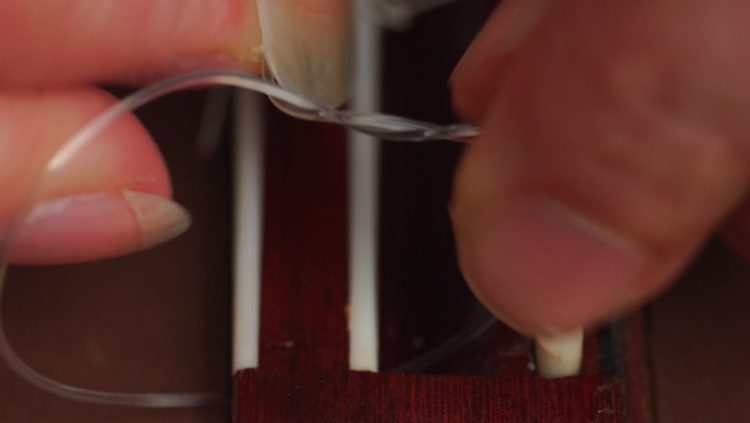
- Now we’re going to wrap the string around itself 2-3 times similar to what we did at the bridge. (For an extra layer of security you can insert the string into the same hole one more time before wrapping the string around itself.)
- We want the wraps of the string as they go around the barrel to be on the inside for the 1st E string and on the outside for the 2nd B and 3rd G strings. This has to do with alignment of the strings in the headstock holes to make sure they have a good string break-angle.
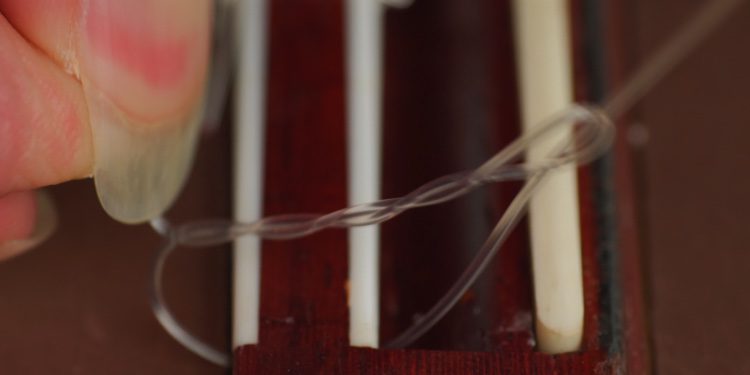
- To accomplish this, you’ll want to be sure to wrap the string so that the tail points in the opposite direction of the wraps. For the 1st E string that means you want the tail of the string to point toward the inside of the headstock after wrapping around the string; while for the 2nd and 3rd strings you want the tail of the string to point toward the outside of the headstock.
- Tune each string to pitch. (Note that as you tune the strings up to pitch they will continually tend to relax and go flat so you’ll need to keep tuning them up to pitch a little bit over the next couple of days.)
Step 3: Remove Old Bass Strings
- Now proceed to remove the bass strings using the same method as above: first hand unwind a few turns to be sure you’re going in the correct direction to loosen the strings and then use a string winder to remove the rest of the string.
Step 4: Put on New Bass Strings
At the bridge
- The procedure for the bass strings is very similar to the trebles, with a couple of key differences. First, you don’t need to wrap the string around itself at the bridge nearly as many times for bass strings. In fact, because of the windings on the outside of bass strings they catch on themselves much easier than the smooth, slick trebles and so one wrap is usually sufficient to hold them in place. Just be sure, once again, to place the tail of the string on the back side of the bridge!

At the headstock
- At the headstock we will again need fewer wraps around the string to keep it secure. As before, after the string is tied at the bridge, pull the string through the headstock barrel hole and pull the string taut.
- Then pull the string around the barrel back toward the rest of the string and wrap it around itself one to two times for each string.
- And once again we want to ensure that the 6th E string has the tail end of the string pointing toward the opposite direction of the wraps around the barrel.
- Just as with the 1st E string you want the tail to point toward the inside of the headstock; the 5th and 4th strings should have the tail of the string pointing toward the outside of the headstock.
- Tune each string to pitch.
Step 5: Clip Excess Strings
For a clean look, take some fingernail clippers or your string winder (if it also has a built-in clipper like this D’Addario / Planet Waves one) and clip the tails of the strings at the headstock and also at the bridge. Be careful not to cut too close. You can leave a few millimeters at the headstock, while at the bridge you should cut the tails close enough that the tails are tucked on the back side of the bridge but not resting on the top of the guitar (where they can rattle and can be the source of buzzes).
***
That’s it! You’re done! Congratulations on changing your strings on your classical guitar!
Now, as I mentioned before you will need to continue tuning the guitar regularly over the course of the next couple of days before it settles into pitch and the strings do not keep going flat. My recommendation is to open up your guitar case every hour or two and tune the guitar to pitch (or even just a bit sharp of pitch) or even tune up the guitar and play for a while, and then come back and do the same thing in another hour or two. Pretty soon the guitar will hold pitch and you’ll have a lovely fresh-sounding set of strings on the guitar…until you have to change them again. ;)
Our Strings Recommendations
Which strings are right for you? Check out our full guide on the best classical guitar strings.
When it comes to the ratio of performance to value, we are quite lucky these days when it comes to guitar strings. They are affordable and they are consistent. Just like the guitar, the strings will affect the sound you produce and experimenting with different strings can be a fun experience but not one we recommend for beginners. So, when you are starting out we would recommend using D’Addario Pro Arte EJ45, which is normal tension, or D’Addario EJ46, which is high tension. The high-tension strings will have a little more resistance on the fingers, so if you are just getting used to the sensation of playing and your fingertips hurt, go for the normal tension.
Why D’Addario? First and foremost, they are affordable and high quality. Secondly, the D’Addarios are good people and both as a family and a company they contribute greatly to the musical community at large.
***
Now that your guitar has a fresh set of strings, why not check out one of our many free lessons? We have created resources specifically to help you progress on classical guitar. If you’d like to dive in deeper, please Join Classical Guitar Corner Academy, our online school for Classical Guitar. You can learn much more here.

Thanks Dave,
Very helpful as always.
Glad you found it helpful, Bob!
Peace,
Dave B (CGC team)
I would recommend using a flame to melt a small knob on the unwound strings before tying to bridge. Pass it thru hole and pull length of string well away from guitar body and use a match or lighter to melt end of unwound string into a bulb. Once hard and cool pull string length through and proceed as advised in video. This prevents string which breaks loose or unwinds from bridge from whipping around and scarring top.
Hi David,
Thanks for your comment. Yes, this is a very common approach to securing the string to keep from slippage. I have found that sufficient ties at the bridge end (and security at the headstock–for instance by placing the string through the hole at the capstan twice before winding the string around itself) to be the best way to secure the string without having to create the ball with a flame. But I know of many luthiers who use that latter method. Best wishes.
Peace,
Dave B (CGC team)
You failed to mention which end of the bass string to insert in the bridge hole. I use the unraveled end. I’ve read that others recommend the unravelled end go into the head stock. Others say it doesn’t matter.
Hi David,
I do mention this in the video, but you’re right I failed to mention it in the post — thanks for pointing that out. The loose end without the extra layer of coil windings for bass strings is intended by string manufacturers to wrap around the bridge because of the thickness of especially the sixth string so that more string is making contact with the surface of the bridge (from what I understand). In my opinion it does not provide enough security, however, and so I insert that end through the headstock capstan hole instead (eventually it will be trimmed off). Best wishes.
Peace,
Dave B (CGC team)
Dave
Thank you. Have you ever tried using a capo to hold the tension on the strings while threading the strings in the head stock? Might save you using three hands.
David
Hi David,
No I haven’t! I’ve gotten so used to repositioning the instrument in various ways to accommodate my entirely lacking two hands that string changing is almost a ritual at this point, but a great tip for others struggling with keeping everything together! Thanks.
Peace,
Dave B (CGC team)
As a beginner I acquired a Yamaha G 55 which is adequate for my current developing beginner level. The same old strings were on it for many years ( 10+). I have had to replace the three base strings in the last 6 months due to breakages ( age) but have not replaced the treble strings ( unknown brand.
Not knowing at the time – the strings i have used to replace the base are Ernesto Palla ball end strings. Hence currently three fresh Bass and three very old treble (unknown brand).
Do you think now it would be worth replacing the whole set now and if so would the D’Addario Pro Arte EJ45 be suitable.
this article is very useful, thank you for making a good article
Thanks, Dave! I’m 77 years old and have not restrung my smaller “women’s” guitar in many years. It’s very challenging to these old hands and brain. I appreciate your help.
I always pass the bridge tags under the wrap of the adjacent string – Taylor have a video on how to do this – it makes for an extremely secure fix and eliminates any buzz from errant string tags.
What about a 12 hole bridge?
That by far was the best tutorial on changing classical guitar strings. Too often the focus would be at the bridge and not the tuners. Often, you could not see the process since the person’s hands blocking the view. Thank you very much.